


|
|
Customizing and Troubleshooting Footnote and Endnote SeparatorsIf your documents contain footnotes or endnotes, you will have run into the concept of separators, which are the short (or long) lines Word inserts between your body text and the footnotes at the bottom of the page or the endnotes at the end of the document or section. There are four kinds of separators:
If your footnotes are mostly quite short, and especially if they are few, you may never see the Footnote Continuation Separator. It is used when a footnote is too long to fit on the page and must be continued on the following page. This happens when the footnote reference in the text occurs so far down the page that there is room for part of the note but not all of it; instead of carrying the note reference and the entire note to the next page, Word fits as much as it can on the first page and flows to rest to the next page. The longer line signals readers that there is something different about these notes (if the note is split in the middle of a sentence, as required by the Chicago Manual of Style, this is an even more obvious clue). Most users have no objection to the Footnote Separator, but they often find fault with the Footnote Continuation Separator. Sometimes they don’t want to see it at all, ever, and sometimes they want it to be the same as the initial Footnote Separator. (As noted above, the latter group got what they wanted in Word 2013 and above.)
What users usually object to most strenuously, however, is the Endnote Separator and Endnote Continuation Separator. Tips for dealing with these are also offered below. Customizing Footnote SeparatorsIf you are following the Chicago Manual of Style, 15th edition, which mandates a short separator line for continued footnotes and no separator for footnotes on the same page, you will need to modify Word’s built-in separators. Fortunately, this is not difficult, and it is done exactly the same way in all versions of Word, the only difference being how the footnote pane is accessed:
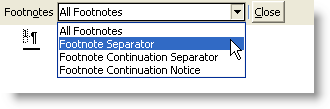
The footnote pane, which will open below the document window, has a toolbar with a single dropdown list box. As shown in Figure 1, this list contains four items: All Footnotes (selected by default), Footnote Separator, Footnote Continuation Separator, and Footnote Continuation Notice. Select the item you want to customize.
Figure 1. The dropdown list box in the footnote pane The separators are of a rather mysterious nature. They appear to be graphic objects of some kind, though with some font and paragraph characteristics, but they are not user-customizable. This means that you can’t actually “modify” them. You can only delete them and/or substitute something else for them. This means that, to meet the Chicago standards cited above, you can:
The above are the two changes you are most likely to want to make, but there are other changes you can experiment with. For example:
Customizing Endnote SeparatorsThere is much more often a need to customize endnote separators. As noted, by default these are identical to the footnote separators, a format that is much less suitable for endnotes, whether you put them at the end of a section (chapter) or at the end of the document. You may well want a solid line (like the Endnote Continuation Separator) between the end of a chapter and the endnotes and no line at all if the endnotes continue to the next page. In that case you can follow procedures like those described above for deleting or swapping separators. The endnote separators are accessed exactly the same way as the footnote separators (see above); in the endnote pane (which will be displayed instead of the footnote pane), you will see an identical dropdown list box, except that it will list endnote options instead of those for footnotes.
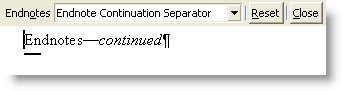
But don’t regard the separators as just a nuisance to be got rid of. Instead, think of how you can divert them to your own uses. Instead of a short line for the Endnote Separator, how about a heading that says “Notes”? And you can also have text reading, say, “Notes—continued” in place of the default Endnote Continuation Separator. To make these substitutions, just delete the existing separators and type in your desired text, applying any desired style. Some caveats about using text separators:
You can get around (2) and (3) by adding an empty paragraph at the end of your document text, formatting it as “Page break before” and 1 point font size and paragraph spacing. This will force the endnotes to start on a new page and use the Endnote Separator, as shown in Figures 2 and 3.
Figure 2. Text Endnote Separator (in Heading 1 style) with empty paragraph above formatted as “Page break before” and 1 point (appearing as a grey line)
Figure 3. How the above looks in Print Preview
Figure 4. The Endnote Continuation Separator for the same document Troubleshooting Note SeparatorsAll of the note separators are in the Normal style, so any modifications you have applied to Normal style will also apply to the separators. The most common problems are indented separators (because a first-line indent has been added to Normal) or unwanted extra spacing (because Normal has been formatted as double-spaced, or Spacing Above/Below has been added). Sometimes, in the course of editing a separator, a user may have pressed Enter and added an empty paragraph below the separator. The procedure for correcting a faulty separator is the same as for editing one. Open the appropriate notes pane, choose the appropriate separator in the dropdown list, and examine it for problems. Be sure that nonprinting characters are displayed so that you can see any extra empty paragraphs that may have been added above or below the separator. Right-click and choose Paragraph and make sure that there are no indents and that line spacing is set to Single. If you have changed the font of Normal, you’ll also need to right-click and choose Font and reset the font to the Word factory default (which may be 10- or 12-point Times New Roman or 11-point Calibri).
Modifying the Footnote Text styleAbove I refer to formatting the Footnote Text style as “Keep lines together.” If you have never modified a style, see Word MVP Shauna Kelly’s article on “How to modify a style in Word.” From there, in any version of Word, you will click on Format | Paragraph | Line and Page Breaks and check the box for “Keep lines together,” then OK twice to exit the dialogs. Use this same procedure to make any other desired changes to the style, such as changing the font or font size or adding a first-line indent or Spacing After. Obviously, none of the above is difficult. What can be difficult is forcing Word to actually display the Footnote Text style so that you can select it.
With any luck, however, you won't have to do any of the above. With the insertion point in a footnote, right-click and choose Style… from the context menu. This will open the Style dialog with the Footnote Text style selected. Click Modify... and make the desired changes to paragraph or font formatting. If Style… does not appear on the context menu, then you'll have to use the methods above. This article copyright © 2009, 2010, 2011, 2014, 2023 by Suzanne S. Barnhill. |