Custom Button Faces
If you are using Word 2003 or earlier, you may have
discovered the usefulness of adding frequently used commands to a toolbar. If
you have not done so, see the article “How
to assign a Word command or macro to a toolbar.” You may, however,
have also found that Word has many useful commands for which button icons are
not available.
This is not an insuperable problem: as described in “Assigning
custom button images to your toolbar and menu buttons,” you can supply
button faces for these orphan commands in a number of ways. (If you have already
created custom button faces in Word 2003 or earlier and want to be able to
retain them in Word 2007 or above, see Word MVP Graham Mayor’s article “Toolbars
and Word 2007.”)
In response to discussion in the
Word New Users newsgroup, I have created a template that contains several
buttons with custom button faces. You can
download this template and use the buttons themselves or the button faces.
Contents of the template
This template contains a custom toolbar named Button
Faces (see Figure 1).
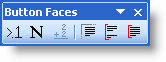
Figure 1. The Button Faces toolbar
On the toolbar are six buttons, all functional, as follows:
 Condensed Font: When applied to selected text, this button condenses the
character spacing by 0.1 point. This can be extremely helpful in copy
fitting.
Condensed Font: When applied to selected text, this button condenses the
character spacing by 0.1 point. This can be extremely helpful in copy
fitting.
 Normal Font Spacing: This restores normal font spacing to text that has
been condensed or expanded, without removing other direct font formatting as
Ctrl+Spacebar would do.
Normal Font Spacing: This restores normal font spacing to text that has
been condensed or expanded, without removing other direct font formatting as
Ctrl+Spacebar would do.
 Formula: The ScreenTip is a little misleading. This button runs the
Tools | Calculate command on selected text (for more, see “Better
than an Easter egg: Using ToolsCalculate”).
Formula: The ScreenTip is a little misleading. This button runs the
Tools | Calculate command on selected text (for more, see “Better
than an Easter egg: Using ToolsCalculate”).
 Para Page Break Before: This button applies the “Page break before”
property to selected text (Format | Paragraph | Line and Page Breaks).
Para Page Break Before: This button applies the “Page break before”
property to selected text (Format | Paragraph | Line and Page Breaks).
 Para Keep With Next: Ditto for “Keep with next.”
 Para Keep Lines Together: Ditto for “Keep lines together.”
The last three buttons are toggles; they have On and Off
states that will indicate whether text at the insertion point has the relevant
format or not.
The first three button images are my own; you can tell from
this that I am no artist. The latter three were created by Word MVP Robert M.
Franz, who is obviously more talented. Note that the ToolsCalculate
button (or menu item) will be disabled unless you have calculable numbers
selected.
How to download the template
When you click on the link to
download the template, you should get a dialog asking whether you want to
open it or save it. You will probably want to save it. Although the file is a
template (.dot file), it will be saved as a document (.doc file). You can change
the file extension if you like; I’m not sure that it matters whether you do or
not. Just save it somewhere accessible. The template contains the instructions
below, so it is self-explanatory.
How to use the template
-
The easiest way to use the template is to steal or
borrow from it.
-
Open the template just as you would a document (if
you’ve saved it as a document, that’s not an issue).
-
If the Button Faces toolbar is not displayed,
right-click on any toolbar and select it from the list.
-
Open the Tools | Customize dialog.
-
On the Commands tab, make sure that “Save in”
is set to “Normal.dot” and not “CustomToolbar.dot.”
-
Drag the buttons to the desired toolbar or menu (you
may want to put the Formula button on the Tools menu,
where it belongs). This is “stealing” since the buttons are moved from
one toolbar to another.
-
If you press Ctrl while dragging the buttons, you
will instead copy them. That is “borrowing” since the buttons are left
on the toolbar (this isn’t really necessary).
-
At this point you have transferred the buttons to
your Normal template, so you no longer need this template. You can save
or discard it as desired.
-
Another way to use the template is to save it in the
Word Startup folder (see Tools | Options | File Locations for the
path to that folder). It will be loaded at startup and be available to you.
The disadvantage to this approach is that you’ll have an extra toolbar
instead of having the buttons on one of your built-in toolbars. I therefore
recommend Method 1 instead.
-
If you already have buttons for some of these features
and just want the button faces, here’s how to get them:
-
Open Tools | Customize.
-
On the Commands tab, make sure that “Save in”
is set to “Normal.dot” and not “CustomToolbar.dot.”
-
Right-click on any button on the Button Faces
toolbar and choose Copy Button Image.
-
Right-click on the button you want the image on and
choose Paste Button Image.
-
Repeat as required.
This article copyright © 2008, 2011,
2014 by
Suzanne S. Barnhill.
|